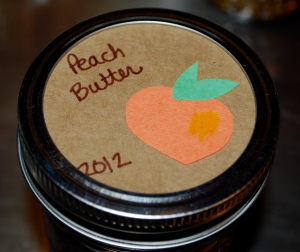
Those of you who have sewn with me know I love to garden and make preserves, too. This year I canned a lot: marinara sauce, pickled green tomatoes, roasted red pepper spread (the best thing I made this year), peach salsa, peach butter, jalapeno jelly, orange marmalade, and blackberry jam. Spoiler alert: if you invite me to your house this holiday season you’ll probably receive a few of these!

I like to cover my jars a few ways, but my favorite is with an elastic jar topper. They use up remnants and present your preserves perfectly. Plus, it allows you to remove the ring so you can use it again.
This is a great project for advanced beginner sewing. The skills you will develop by sewing these bags are:
- cutting circles
- sewing in a circle (sewing around)
- sewing with elastic thread
Supplies needed:
- your basic sewing supplies
- woven fabric remnants of two different fabrics
- elastic thread (I like Gutermann)
- optional: 1/4″ elastic (in case you have difficulty shirring with your drop-in bobbin machine)
- circle elastic jam jar templates PDF
ALL SEAM ALLOWANCES ARE 1/4″
Step one: Cut Circles
Place fabrics right sides together (place a couple of pins if you don’t want the fabric wiggling). Use the template, draw a circle with a protractor or find a plate/tin, etc. to trace. Cut two circles; one from each fabric. For wide mouth you will need a 7.5″ circle, for small mouth, you will need a 6.5″ circle.

Step 2: Sew Circle
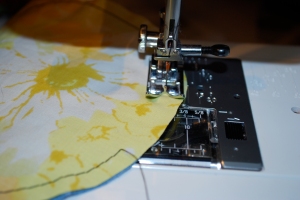
Keeping circles right sides together, sew all the way around, leaving a small space for turning.
Step 3: Turn Right-Side-Out
Clip notches into fabrics and turn right side out and press.

Notches will prevent buckling as it removes the excess fabric before turning it right side out.
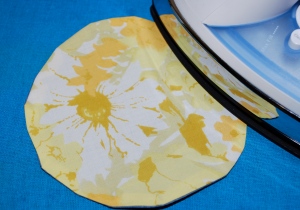
Take care to make sure seams are pushed out. You may want to use a chopstick to run along the inside of the seam. Take care when pressing the opening.
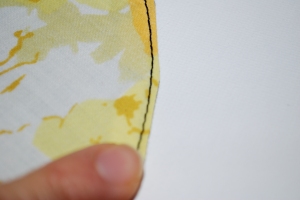
Step 4: Topstitch
Topstitch as closely to the edge as possible. This will also close the opening.

Step 5: Sew on elastic
Find the center and draw a 3.75″ circle for the small mouth and 4.5″ circle for wide mouth jars.

Take an empty bobbin and wind by hand. Do not pull the elastic, but do not leave it completely slack as you wind it. I try not to think about it too much and wind it quickly and evenly. Place bobbin in bobbin case, but do NOT feed it through the threading slot. Instead, the elastic should come up through the needle plate without any tension. (You’ll feed the bobbin thread as you always do, holding the upper thread tightly toward you and turning the hand wheel.)

Elastic will come up through the plate as shown. If you need help, there are plenty of tutorials and You Tube videos to help you.
Set stitch length at longest (4 or 5) and thread tension at the highest (probably 9). With the right side up, sew around the circle and backstitch at the end to secure.

As you sew, it will begin to gather. A quick steamy press will cause the elastic to gather even more.
Give the elastic a good steam with your iron. Tada!

Note: If you have a drop-in bobbin machine, you may have to do some research on elastic shirring. Front loading machines have higher bobbin tension. You can counter this by adjusting your tension on your bobbin case (which I don’t really recommend for new sewers; buy a second case and adjust that one if you want to go this route). You can also research shirring for your particular machine–there is a lot on YouTube!
Another Option for Sewing Elastic
You can always sew on 1/4 inch elastic:
Follow steps 1-4 as written. Cut an 8″ piece of 1/4″ elastic for small mouth jars and a 10″ piece of 1/4″ elastic for wide mouth jars. Find the center and draw a 3.75″ circle for the small mouth and 4.5″ circle for wide mouth jars.
Mark the half-way points on circle and elastic. Place the elastic at one of the circle marks and, as you sew, try to make the midway point on the elastic meet the second midway point on the circle.

Don’t pull on elastic until you have stitched and backstitched. Once stitches are secure, you can begin to pull the elastic. Sew carefully down the center of the elastic.
Backstitch to get sewing machine going over the elastic. As you sew, gently pull elastic taught, making sure the dots line up with lines on the fabric. Do not pull the fabric. If you have extra elastic when you return to the start, simply cut it away.

It will gather as you sew. Just take your time and you’ll be happy with the results.
By the way, if you don’t have time to sew an elastic topper, there are always these quick solutions!

Felt is easily cut and threaded with ribbon or embroidery floss for a cute no-sew topper. Adorn with cinnamon sticks, mini pinecones, buttons, etc. to really set it off. Or, pink a quick circle and lock it down with the ring.
Get the kids involved and use a paper bag for the lid cover and cut out images from scraps of paper or felt and glue on top of brown paper. Screw on cap to hold it on. Or, if you want to go an even easier route, purchase scrapbook stickers and use those!
Finally, if you like wrapping your jar toppers with twine, this is a total indulgence, but you can buy beautiful twine at Gardeners Supply.
A side note: NEVER recycle a mason jar!!! If you aren’t going to reuse it, return it to the giver or another person who cans!!! I never expect my jars to be returned, but it sure is nice when someone does! 🙂